 Artemis II is scheduled to launch in September 2025. It represents mankind's return to the moon. As we wait with anticipation, meet the astronaut who is going to pilot the spacecraft: Victor J. Glover.
Victor Glover, born April 30, 1976, spent his youth wrestling, playing football, and pursuing engineering degrees. He earned a degree in general engineering from California Polytechnic State University in 1999. Between 2007 and 2010, he obtained three different master's degrees from three different institutions. He has a Master of Science in Flight Test Engineering from Air University (United States Air Force) in Edward's Air Force Base, a Master of Science in Systems Engineering from the Naval Post Graduate School, and a Master of Military Operational Art and Science from Air University in Montgomery, Alabama. Glover is a captain in the United States Navy. He has been a naval aviator, as well as a test pilot for the United States Air Force. During his career, he has accumulated more than 3,000 flight hours. His callsign is "Ike", a moniker bestowed on him by one of his first commanding officers. It stands for "I know everything." Glover was a crewmember of Expedition 64, where he served as station systems flight engineer on the ISS. He is married to Dionna Odom Glover, whom he met in college. They have four daughters.
0 Comments
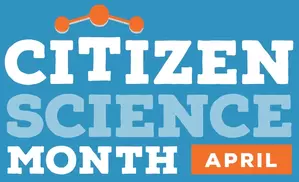 Did you know that NASA has several projects going on that rely on help from people like you? In fact, more than 500 "citizen scientists" have been named as co-authors in scientific publications due to their contributions to NASA's research! There are currently 43 collaborative projects underway. You can read about all of them and how to contribute here. You should also follow @DoNASAScience on X and @DoNASAScience on Facebook. Here is a sampling of some of the projects.
NeMO-Net NeMO-Net is a single player iPad game where players help NASA classify coral reefs! Anyone with a cell phone or laptop can do this project. Mountain Rain or Snow Did you know that most weather stations can't tell if it's raining or snowing? The best observation method is still the human eye! This project relies on reporting from eye witnesses to support better weather resources and forecasting. Anyone with a smartphone can do this project. Landslide Reporter Landslides occur in all environments and can cause sudden and unexpected damage. Report landslides to NASA and help their scientists develop a predictive model of where landslides are likely to occur. Anyone with a laptop can do this project. Happy Earth Day! As you know, at the Douglas Space and Science Foundation, we absolutely love planets--especially this one! In honor of Earth Day, here are some STEM activities that you can do that are all about this planet we call home.
Make recycled paper Materials:
2. Put your strips in a bowl. Cover with warm water and soak overnight. 3. Put the contents of your bowl in the blender. Fill the blender half full with water. Blend to make pulp. 4. Put the pulp in a mixing bowl and mixing with your hands. 5. Put the sieve in the bowl. Allow the pulp to settle over it. Gently lift it with a layer of pulp covering it and let the water drain. 6. Put the paper on top of a dish towel. Place another towel on top and pat off any excess water, then peel the top towel off carefully. 7. Carefully remove the paper from the sieve. Flip it onto another dish towel, and cover with another towel to dry. 8. Once it is dry, carefully remove the dish towels. You made recycled paper! Learn how color affects temperature Materials:
2. Use the rubber cement to attach the paper to the box as smoothly as possible. (Try to avoid air pockets between the paper and the box.) 3. Do the same thing using the black and gray construction paper and the other boxes. 4. Place the thermometer inside the white box. Take it outside and leave it in a sunny spot for 30 minutes. Record the temperature on the thermometer. 5. Place the thermometer in the shade somewhere near the box (still outside.) When it has adjusted, record the shady temperature. 6. Repeat these steps with the black and grey boxes separately. 7. Look at your findings. Which box was the warmest? Which was the coolest? The black box will likely be the hottest and the white box the coolest! Grow seeds in eggshells Materials:
2. Push one seed gently into the soil of each eggshell, making sure the seed is covered with dirt. 3. Use a small spray bottle to dampen the soil. Be careful not to over water. 4. Give the seeds three days to begin to grow. 5. Each day after that, break open an egg shell to observe each stage of seed growth! Have fun! If you have another great science project you'd like to share, tell us about it! Natural recyclers are animals, plants, and fungi that break down dead things and waste into air, water, and nutrients. Without them, the world would quickly run out of these essential ingredients of survival! There are two main kinds of natural recyclers: detritivores and decomposers. Detritivores are animals that eat detritus. They chew, grind, and tear once-living things into tiny pieces. Bacteria in their bodies helps them take the nutrients they need out of their food and then they deposit the rest back out into the world. Click through the slideshow to see some examples of detritivores! Decomposers are not animals. They are other living things like bacteria and fungi. They turn big things like proteins and fats into little molecules that other living things can use. Click through the slideshow to see some decomposers! Whew, Spring Break wasn't long enough. We're ready for a vacation. The moon sounds fun! Come along with us as we imagine our way there.
If someone offered you a trip to the moon, would you take it? Why or why not? If our trip was three days long, what would you put on the itinerary? What sort of exploration would you do? Aside from a camera, what would you bring with you? What would be the coolest thing about a trip to the moon? What would be the worst thing? If you were a tour guide on the moon, what would your day be like? If you're feeling inspired, write a story about your trip to the moon and share it with us! Check out this activity if you need some ideas. Wow your friends and family with these cool tricks!
Disappearing Juice Cranberry juice Clear glass Eyedropper Bleach 1. Pour about half a cup of cranberry juice into the glass. 2. Use the eyedropper to add a little bit of bleach to the glass. Keep adding bleach until the juice turns completely yellow. 3. Slowly pour a steady stream of cranberry juice into the glass and watch the color completely disappear! Rainbow Milk Milk Food coloring Toothpicks Liquid soap 1. Pour some milk into a shallow bowl. (Higher fat milk works best.) 2. Add one drop of four different colors of food coloring. Put them close together but not touching. 3. Dip a toothpick in liquid soap and place it in the middle of the container, not touching any of the colors. 4. Hold the toothpick down and watch what happens! Magic Candle Small candle Glass Plate Lighter or match Water 1. Place a small candle in the center of the plate. 2. Light the candle. 3. Pour some water onto the plate. 4. Place the glass over the candle. 5. As the flame is extinguished, the water on the plate will get sucked into the glass. Did you know that you don't have to wait until you are grown up to use your big ideas? Meet some kids that have had big success with STEM at young ages!
1. 14 year old Kedar Narayan (aka Little Code Ninja) came up with the idea for a game to teach kids the fundamentals of coding when he was five years old. His parents suggested he look into learning coding because he loved to play video games. His board game StoriBot is designed with visually impaired players in mind, by using 3-D playing pieces and braille. 2. Lydia Denton is a 16 year old engineer who uses her personal challenges to inspire her inventions. She invented a "halcyon bracelet" that tracks the users body movements associated with anxiety and gives an alert when they have reverted back to body-centered recurrent movements. She also invented a "Beat the Heat Car Seat" that can tell when a child has been left in a car and initiates a call to emergency services. She is passionate about inspiring other women and girls in STEM. 3. 16 year old Zidaan Kapoor has life-threatening food allergies that have caused serious reactions and landed him in the hospital. Because of this, his mental health has suffered due to food allergy anxiety. This led him to develop an app called Fight Fears to help other kids suffering from food intolerance anxieties. The app gives users individualized challenges to help them overcome their fears in an engaging way. 4. Sanjith Udupa, 17, volunteered to help start and sustain FIRST Tech Challenge teams in inner-city Detroit. This program encourages kids to design and create competition robots. He also runs programming workshops for kids around the world and runs a YouTube channel. Do you know a kid who is making big waves in STEM? Tell us about them! KZIDAAN KAPOOR  Recycling is an important way to help the Earth by preserving finite resources and cutting down on waste. Did you know that finding new and better ways to recycle is something that many engineers around the world focus on? Here are some of the latest innovations in recycling technology.
1. Smart Bins A smart recycling bin is a new kind of waste bin, fitted with sensors, connectivity features, and data analytic capabilities. Basically, all of these technologies do the work of separating waste into proper receptacles to make sorting recycling more efficient. 2. Artificial Intelligence Recycling facilities suffer from a shortage of workers and with the rising cost of recycling. Robots and special optical cameras are being developed to sort through recycling as it is moved down a conveyor belt, and separate items that cannot be recycled. 3. 3D Printing 3D printing uses a lot of materials, but it's estimated that right now, only 10% of those materials are recycled. There are recyclable materials that can be used in 3D printing, and scientists are working on making it more sustainable. Some projections show that up to 40-60% of 3D printed items can be recycled. 4. Pyrolisis Pyrolisis is the leading technology involved in advanced plastic recycling. How it works is that plastics are superheated to temperatures of 500° C in the absence of oxygen. The plastic waste is vaporized in the pyrolysis reactor and then condenses to produce pyrolysis oil (as well as some other byproducts.) Essentially, it produces far less waste than less advanced recycling methods and generates reusable products. 5. Nanotechnology Nanotechnology is being used to create materials that are stronger and more durable, which also makes them more recyclable! What do you think will be the next innovation that helps cut down on waste? 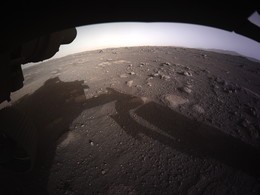 An image of the Jezero Crater taken by the Perseverance rover. Image credit: NASA/JPL-Caltech An image of the Jezero Crater taken by the Perseverance rover. Image credit: NASA/JPL-Caltech The Perseverance rover, launched July 30, 2020, has a special mission on the surface of Mars. The rover, along with its aerial sidekick the Ingenuity helicopter, have the assignment to study the geology of Mars. This includes seeking signs of ancient microbial life and collecting samples of rock and soil. Part of the mission was also to demonstrate the technology of the Ingenuity helicopter. So what has Perseverance discovered so far?
The most exciting finds have to do with the Jezero crater. Previous orbital images of the crater discovered the crater and suggested that there used to be a lake of water there. Perseverance has been able to get a lot more information from the surface of the planet. For instance, on the floor of the crater, the rover discovered igneous rocks. These suggest the possibility that the lake may have been filled with lava before it was filled with water. When water flowed in and covered the igneous rocks, it would have created salty mudflats that would likely have been good habitats for any martian life that may have existed. Perseverance has also found evidence that there used to be winding rivers on the surface of Mars. All of these discoveries are important because they show us that Mars used to be very different than the planet we know today. When the rocks that Perseverance is studying were formed, Mars was full of activity-there were volcanoes, flowing rivers, lakes, and even, possibly, life. Today it is cold, dry, and quiet. Perseverance may give us some clues as to what happened to change the planet so drastically! International Women's Day is on Friday, March 8th. We thought we would celebrate a few days early by highlighting some amazing women in STEM! These five inspiring women have contributed significantly to their various STEM fields across the world. |
Archives
July 2024
Categories |
 RSS Feed
Contact Us |
|
Follow Us |
© Douglas Space and Science Foundation, Inc. All rights reserved.
Click to set custom HTML